1. Features and Functions:
● Adopts industrial degree MCU SCM and particular software, reach intelligent control.
● PWM charging control mode, charge in high efficient.
● Battery reverse connection, over-voltage and low-voltage protections.
● Load output resume, output over-current, and output short-circuit protections.
● Solar panel short-circuit protection
● Battery open circuit protection
● High precision voltage recognition function
● LED indication for battery capacity
2. General Introduction
CMP series solar charge controller is especially designed by industrial degree MCU SCM with high-performance and excellent quality, and designed for home solar power system and solar power station.
Functions:
1) Battery management function:
Over-charge protection and over-discharge protection ensure the normal using and prolong the longevity of battery.
2) Temperature compensation function:
Auto adjust the setting data of battery management program control parameters to avoid the battery “under-voltage” in winter and “over-charge” in summer.
3) Multi-protections:
Battery reverse connection, over-voltage and low-voltage protections, solar panel short-circuit protection, auto. Resume output, and output short-circuit protections.
3. Technical Parameters
|
Model No.
Parameters |
CMP1024 |
CMP1524 |
CMP2024 |
|
Rated Voltage |
12V / 24V |
|
Rated Current |
10A |
15A |
20A |
|
Over-Charge Protection |
14.4V / 28.8V ± 0.2 Vdc |
|
Over-Discharge |
Cut-off |
10.7V / 21.4V ± 0.2 Vdc |
|
Resume |
12.6V / 25.2V ± 0.2 Vdc |
|
Over-Voltage |
Cut-off |
16.5V / 33Vdc |
|
Resume |
15.0V / 30.0 Vdc |
|
Voltage Drop |
Between input and batteries |
<0.2 Vdc |
|
Between batteries and load |
<0.2 Vdc |
|
No Load Current Draw |
<15 mA |
|
Ambient Temperature |
-10 ~ +55 °C |
|
Altitude |
≤5500m |
|
Size (L*W*H: mm) |
164*100*48 |
|
Weight (Kg) |
0.39 |
|
Temp. Compensated factor |
-4 mV / cell•°C |
|
|
|
|
|
|
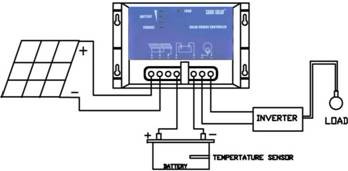
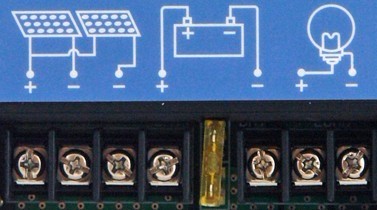
4. Connections
1) Connecting all parts correctly according to the following drawing, make sure polarity is right. The order is as follows.
a) Connect the controller with the battery first, then connect the solar panel, finally connect the load.
b) Disconnect from the controller: disconnect the load first, then solar panel, finally disconnect the batteries.
c) When connect the lines, make sure the “+” and “-” are not reversely connected.
d) Do not connect the line of battery to the solar panel terminal.
e) Do not connect any regulated power supply or charger to the solar panel terminal
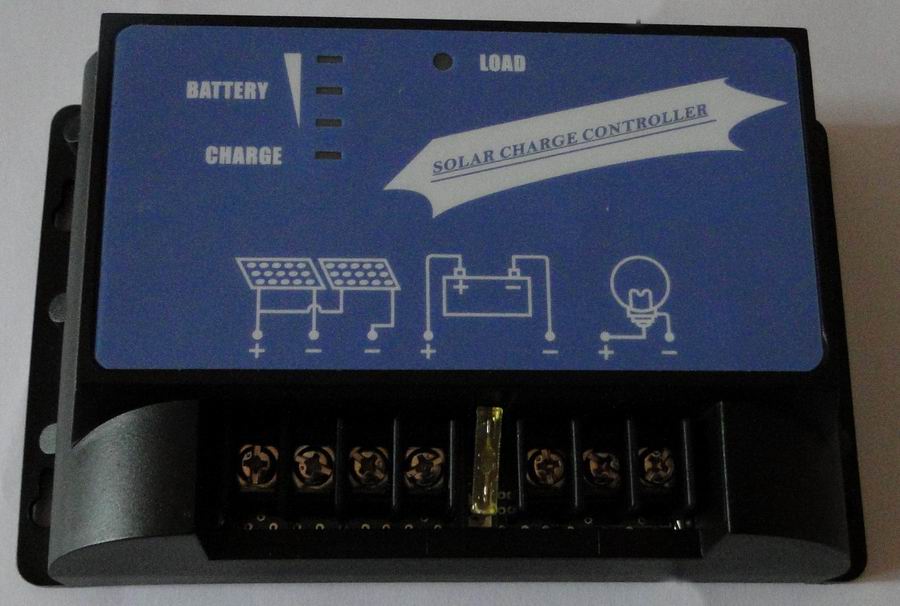
5. Status Indication
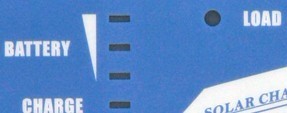
5.1 If the connection is correct, the indicators will show the capacity of the battery, and the load indicator will be on.
5.2 The charging indicator will be on when it is at charging state, and the charge indicator will flicker when the battery is charged full.
5.3 When the battery is in low capacity, the battery indicator will flicker. It means you need to charge the battery now.
5.4 The load indicator on or off represents there is load output or there is no load output.